Entries tagged as electronics
Wednesday, February 3. 2021
Restoring sideswiper mode of the Begali HST morse key

... on ham radio TRX like Yaesu or Kenwood
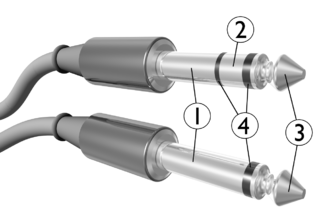
The Begali HST III morse key is a single-lever paddle that also has a sideswiper mode built in: By flipping a switch on the key’s base, one can operate it as a sideswiper. But why actually is that switch needed? Well, a single-lever creates electric contact on either of two sides, which have to be distinguished, because one side tells the keyer to emit dots (dits) and the other to emit dashes (dahs). That’s why a stereo jack is used to connect to a TRX, because that jack can carry those two channels. When using the single-lever as a sideswiper, though, both sides are equivalent and should simply trigger a key-down. Straight keys can be modeled using a mono jack only. So, for using the Begali HST III in sideswiper mode, both contacts have to be routed the same way, while in paddle mode, they have to stay separate. That’s what that built-in switch is for.
On my Kenwood TRX though, I was disappointed to notice that sideswiper mode of that key doesn’t work: When I plug it into the straight-key socket of my Kenwood TRX, a continuous key-down is emitted! It looks like Begali decided to make both contacts equivalent by shorting them. But thinking of the design of mono jacks, where most of the jack consists of common ground while only the tip carries the channel, that means that if that stereo jack is plugged into a mono socket, a part of the body and the tip are short-circuit, which simply means: key-down!
So, after wrapping my head around this and getting in touch with my CW Elmer, Heinz OE3LHB, he told me he’d gone through that before, with his first-generation Begali HST and his Yaesu TRX. He sent me this sketch of the original wiring and the sketch of the wiring that is needed for sideswiper mode to work on those TRX that expect a mono jack on straight keys:

So, instead of shorting upper and lower contact, both contacts should be routed to the tip. If you look closely, you notice that the 2-pin on/off switch has to be replaced by a 3-pin on/on switch. The 1st-gen HST came without wiring, the YL/OM had to do the wiring themselves, so, this mod wasn’t overly complicated to do. But the HST III comes with the wiring realized on a PCB:


The procedure to implement the desired wiring is:
- Find a 3-pin on/on switch with the exact same size specs of the original switch. I soldered the original switch out and made measurements with a caliper, it should resemble a 5×8 mm rectangle when viewed from the top. I found a matching switch here.
- Make a third hole to be able to fit the third pin of the switch through the PCB.

Switch removed, placement of the third hole marked, which will lead right through the conductor path - Place the new switch on the PCB and screw the PCB back in. Only then start soldering the outer pins of the switch to the respective conductor paths. Take care to leave the middle pin isolated from those. (Maybe you should do #5 before this.)
- Disconnect the switch from the bottom contact (BOT) by scratching through the conductor path. That is, only keep contact with the RING.
- Connect the middle pin of the switch to the bottom contact (BOT) using isolated wire and a soldering eyelet. (You could also paint a conductor path at the left border of the PCB, if you can do this.)


By this, sideswiper mode finally works. I sent this mod to Bruna Begali and explained why we needed to do that, but I didn’t receive a reply. Maybe they use TRX that work with the original wiring, or that key is rarely used in sideswiper mode. I never use it as a sideswiper anyway, but at least I restored that option for me.
Friday, January 31. 2020
Construction report QRP-Labs.com 50W PA
In June last year, when I talked to Hans, G0UPL, ordering his QCX kit at his booth at the Ham Radio fair in Friedrichshafen, he mentioned that there would be a 50 W PA kit coming out soon, and that stuck with me. Meanwhile, I noticed indeed that QRP is just no fun when no one is answering your calls—sorry for having to say this. I like to think of this as a kind of “Law of the Conservation of Effort”: If a DX contact is established, and one of the stations is QRP, then the other one is doing all the work and effort (in terms of operating a respectable receiving antenna and/or “having to crawl into the speaker”). Well, thinking of my main goals that led me to the QCX, which were
- assembling a TRX completely on my own,
- getting a lightweight TRX, no matter its power,
- having it only support CW,
wouldn’t there be a better follow-up step than
- assembling a PA kit,
- a lightweight PA such that QRP is no longer an option (hi),
- having it only support CW (not sure about this, though, but at least it’s marketed as “the QCX PA”).
So, I kept close eyes on the QRP Labs site in the recent months for signs about that PA, and finally, at the beginning of December, Hans announced that PA on the mailing list, and only about one hour later my order was through. I was one of the lucky ones that could include his enclosure kit before it went out of stock.
QCX mods
While I waited for the kit to arrive, I had time for preparation: The QCX needed a PTT mod to be able to provide a PTT signal to the PA; this is achieved by patching a stereo jack into the circuits (plus creating an outlet in the QCX’s enclosure) and adding a pull-up resistor. I also flashed the latest firmware release using an Arduino Uno as programming device, which might be a topic for a different blog post. The harder question to answer was how to get a cheap but still qualitative 20 V 5 A power supply for the PA. Luckily, I already possessed the Lenovo UltraSlim 90 W (20 V 4.5 A) notebook travel power adapter, which even included the option to use a wall socket or a standard automobile 12 V plug. Therefore, I could even go from a standard 12 V lead-acid battery. I only needed a non-standard DC barrel adapter, which took some extra time to arrive. While I was at it, I purchased a 3S LiPo battery pack with nominal 11.1 V to power the QCX itself with something lightweight; note that I measured up to 13.1 V fully charged, so using a fresh 4S pack might fry the QCX.
The PA kit arrived after Christmas, and I was again looking forward to the assembly process, which promised to be not as lengthy as that for the QCX. It took me about ten hours nonetheless, mainly due to assuming errors where there had been none. I will now go over some specialties that I had encountered during the assembly.
Continue reading "Construction report QRP-Labs.com 50W PA"
Thursday, February 25. 2010
Droid and iPhone dislike cheap USB chargers unless...

... you have an electronic hacker in your neighborhood. I bought the cheap Chinese solar USB charger revolt “4 Seasons” and wanted to use it to charge my Motorola Milestone/Droid or other devices while travelling by train or bike or during a hike. Unfortunately, it only provided power to “dumb” devices like not-so-smart phones or USB On-The-Go hard disks. When I connected it to my Milestone, the phone didn’t jump to the charging state. WTF? It turned out that modern smartphones like Milestone/Droid or iPhone rely on a properly implemented USB standard, what means that it’s not enough that the two outermost USB pins carry the needed voltage, but the inner pins must also provide a minimal “data voltage”. The problem is described here, and here is a DIY solution.
Thanks go to my work mate Wolfi for hacking the solar charger successfully.